Although
most of you have put up your top without problems and
may think instructions for something seemingly simple
are ridiculous, there is a way to do this that will
minimize strain on the front bow. Even if your front
bow appears "fine", it may have had a lifetime of
stress and if it hasn't been structurally reinforced
it is prone to failure. By some simple steps you can
prolong the arrival of this problem.
Unlubricated
rear pivot points increase the stress putting the top
up. Lubricate all of the pivot points in the hinges of
the rear bars. There are differing opinions on what to
lubricate the joints with, light oil, dish soap,
silicone spray etc, but you want the rear frame to
collapse and open with a light touch.
Also
compounding the problem is that many cars are missing
the spacer under the center softop latch. This spacer
corrects the mounted position of the center latch.
Without it, the force of the center latch increases
the likelihood of bending the middle of the bow. This
part has never been available separately from Nissan.
We sometimes have repro's in stock. If need be you can
stack flat washers about 1/4 inch thick on each screw
as a substitute. (you may need longer
screws).
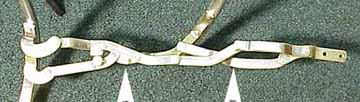
Undo
the softop material completely from the sides of the
car. You can also leave the connection of the two
frame side support posts behind the door off as well.
Whether or not this step is necessary depends on the
overall stiffness and tightness of your top. There are
also adjusters on most of the 68-70 frames to release
the tension on the top, shown in the picture below.
(Earlier car also used adjustable side supports that
held the frame side support bars. A big knob allowed
you to raise or lower the top about 3 inches. These
original 65-67 1/2 parts can be installed on your
68-70. ) Some people have taken to putting another
hole in the each of the top frame side support posts,
but this is usually not necessary.
As
you sit in the car and bring the frame over your head,
as you pull the front bow gently forward, you must
insure that the rear collapsible frame set is
straightening out over the two windows. Basically as
you gently push each side of the front bow forward,
left side forward, right side forward, left side
forward etc, you push up on the frame with the palm of
your hand, shown by the arrows in the picture below.
This will help the frame straighten out to allow the
front bow to reach as far forward as possible. Just as
the front bow reaches its full forward point, it will
also pivot and twist down towards the windshield frame
so the weatherstrip on it is sitting flat, parallel to
the windshield frame, in a relaxed position. No force
should be necessary to hold it there.
To
snap the top clamps, it should be like closing the
latches on an empty suitcase, not a stuffed suitcase!
The top clamps are adjustable. The screw holes aren't
"holes" they are slots, loosen the screws and push the
top latch away from the windshield and that latch will
pull harder. If one is too tight, it will usually
cause the other ones to be too loose and rattle or
fall open. These latches aren't holding a tractor down
on a trailer, they are just there to pull the top down
wih enough force to slightly crush the weatherstrip so
at least most of the rain doesn't come in. They should
be adjusted just tight enough so they snap shut with
enough force that they don't rattle open. The center
latch has a locating peg that slides into a
rectangular hole in the center visor mount (also the
mirror mount). Don't forget that this latch needs the
spacer underneath it described previously.